If your home had a Most Reliable Player award, your water heater would win it every year. It’s there for every hot shower, every dish scrubbed in the sink, and every cozy bath after a long day. Hidden away in the basement or utility closet, it doesn’t ask for much, just a little maintenance now and then to keep it going strong. Think of it like that dependable neighbor who always waves but never causes a fuss.
But just like any machine, it can’t run forever without attention. Over time, minerals and sediment collect inside the tank. The good news is that learning how to flush your water heater tank is easier than you might think, and it can save you from bigger problems in the future.
Why Flushing a Water Heater Is Necessary
Sediment buildup is the silent troublemaker inside your hot water tank. The minerals in hard water, like calcium and magnesium, settle at the bottom and create a layer that forces your heater to work harder. Over time, this layer can:
- Reduce efficiency and raise energy bills
- Shorten the lifespan of your unit
- Cause leaks or damage inside the tank
- Make heating elements wear out faster
Learning how to get sediment buildup out of a hot water heater protects your investment and keeps hot water flowing for years. A hot water tank flush also gives you cleaner water for showers, cooking, and laundry.
How Often Should You Flush?
Most experts recommend flushing a water heater once a year. If you have particularly hard water, it may be smart to do it every six months. Signs that it is time include:
- Cloudy or rusty-looking hot water
- Strange popping or rumbling noises from the tank
- Slower heating or running out of hot water too quickly
If you’re unsure, scheduling a water tank maintenance check with a professional can provide answers and help you feel confident about your system.
Tools You Will Need Before You Start
Before diving into the correct way to flush a water heater, gather a few simple tools:
- Garden hose
- Bucket or floor drain
- Towels for drips
- Screwdriver for some valve types
- Protective gloves
- Access to a nearby sink or drain
These basics will set you up for a successful water tank flush.
Step-by-Step Guide to Flushing a Water Heater
Ready to roll up your sleeves? Here is the step-by-step guide to flushing a water heater safely at home.
1. Turn Off Power or Gas
If you have an electric water heater, flip the switch at the circuit breaker. For gas units, set the thermostat to “pilot” and shut off the gas valve. This step is about safety.
2. Shut Off the Water Supply
Turn the cold-water supply valve off. This prevents more water from rushing into the tank during the flush.
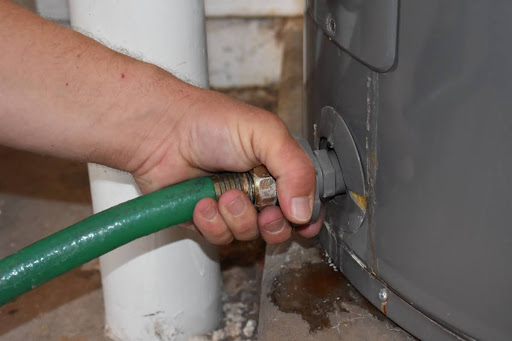
3. Connect the Hose
Attach a garden hose to the drain valve located at the bottom of the heater. Run the other end to a floor drain, bucket, or outside.
4. Open a Hot Water Tap
Pick a sink or tub tap in your home and turn it on. This helps relieve pressure and prevents a vacuum from forming in the pipes.
5. Drain the Tank
Slowly open the drain valve and let the water flow out. Watch for cloudy water or visible sediment, which shows that the buildup is being cleared away.
6. Flush With Cold Water
Once the tank is mostly drained, turn the cold-water supply back on briefly. Let it run through the system for a few minutes to wash out any lingering sediment. Then shut the supply off again.
7. Refill and Restore
Close the drain valve, disconnect the hose, and turn the cold-water supply back on fully. Once the tank is full, restore power at the breaker or relight the pilot light.
How to Flush Your Water Heater Tank the Right Way
Knowing how to flush your water heater tank is about patience and doing each step carefully. Rushing through can lead to leaks or damage. A slow, steady drain clears more sediment than blasting it out. If you’re uncertain about any step or if your tank hasn’t been serviced in years, call an experienced technician for help.
A professional has the tools to do the job thoroughly, check for leaks, inspect the anode rod for corrosion, and make sure your thermostat and relief valve are in good shape. That’s where water heater maintenance services really shine. They go beyond cleaning and help catch small issues before they turn into big expenses.
Wrapping It All Up
Your water heater may not get the spotlight, but it’s the backbone of your home’s comfort. Learning how to flush a water heater keeps it humming along and avoids those cold-shower surprises. Follow this step-by-step guide to flushing a water heater, and you’ll extend its life, improve efficiency, and keep hot water ready for your family.
But remember, even the best DIY flush can’t replace professional water heater maintenance. Experienced technicians do more than clear sediment. They inspect, test, and fine-tune every part of your system. That’s how you protect your investment for the long run.
Give Your Water Heater the Care It Deserves
Don’t let sediment steal the comfort of reliable hot water. Schedule a water heater maintenance appointment with All Seasons Heating & Cooling. Our team in Midland, MI, makes the process simple, thorough, and hassle-free, giving you confidence that your system is in good hands.
Whether you need a routine flush, a repair, or even a full water heater replacement in Midland, we’re here to help keep your showers hot and your home comfortable. Call us today to get started!